Standard Machining Tolerances: Learn Ultimate Guide
 Published:Aug 18,2023

Machining industries follow tolerances from engineering drawing of job but the challenge is that how can workpiece receive tight tolerances from different machining operations without compromising surface finish. You have to learn basic ideas, reason, importance and methods to achieve machining tolerances, so that whenever they are present on drawing then its processing with respect to machining accuracy capability does not hurdle in the way of job qualification.
For more understanding please visit on following YouTube videos:
https://www.youtube.com/watch?v=kzqX0oUUY_U
and
https://www.youtube.com/watch?v=zj1_uPSP6i8
Article Contents
Tolerances by CNC Machining Process
3 Tips for Acquiring Precision Machining Tolerances
How Precision Impacts Product Quality
How to Zero Tolerance Machining
Why Choose China Tuofa Custom CNC Machining Parts
What is Machining Tolerances
Engineering workpiece goes to design stage even before it enters to warehouse in material form, and at this stage it gets its final assembly counterpart whom it should meet at assembly table. But to assemble the same part there must be some dimensional rules to follow, otherwise no part can connect with other and here the concept of machining tolerances comes in workshopand CNC machine. This tolerancedecides that howmuch precise machining tools have to bear cost for optimization in machining, good quality product and zero machining tolerances equivalency.
Understanding the Basics of Machining Tolerance
This requirement comes from the concept of job assembly with good engineering practices because if two mating parts does not have comparable dimensions to join with each other then it is much difficult to get quality product. And only way to get good tolerance is by machining tolerance allocation methods, because in this way workpiece goes to uniform reduction in dimension at particular face. But achieving machining tolerance is also another subject of assembly engineering because machining pattern does make effect on job as well by different kinds of machining functions, tolerance analysis, material composition and Tolerance Analysis.
Types of Machining Tolerances
These are of different types depending upon dimension measurement, job under consideration, numeric value achievement and tolerance analysis. Machining tolerances can be unilateral in nature where dimension variation control gets its qualification in one linear direction only, same is need in clearance fit job. Or it can be bilateral where it gets dimensional variation control in two aspects of dimension, for example in positive and negative axis both. Another control is also applicable where limits are the final values instead on dimensional control onevery single value.
Types areas follow:
Geometric Tolerance
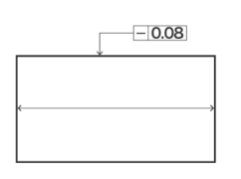
These types of dimensional variation control are present on engineering in the form of graphical representation like some symbol mayshow flatness, straightness, parallelism, boring variation and datum reference. They tell the machinist to take some reference on the space and then all the dimensional variation of job should be in control of that reference without involving third party measuring tool. They represent the general variationcontrolof dimensioninsteadoffixedvalueoneverypointof jobsurface otherwise it takes too much space of 2D drawing to elaborate the machining tolerances of one product profile.

Figure.No.1 shows geometric tolerance.
Dimensional Tolerances
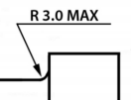
It is present on the single value dimension without any graphical representation and datum reference, because only one value of numeric value can tell machinist and fabricator to assemble job without any error. You have to follow same numeric figure on every point of job profile because no variation in profile is present at any surface of it. This tolerance value achievement is easy for machinist because it is flat value without any reference and imaginary line calibration in contrast to geometric tolerance. This is most common tolerance present on engineering drawing because engineering job always have one value figure.

Figure.No.2 shows dimensional tolerance.
Click herefor understanding and getting information from TuofaCNC about dimensional tolerance.
Standard Machining Tolerances
It is common practice tolerance value which is present in most of CNC machines to which extent they can control the variation in their dimensional figures. This value is usually around ± 0.13 mm and it can be on lower side by controlling various factors of material, process, heating, precise machining tools and tolerance analysis. It is also possible that even machine capable of achieving this much tolerance can deviate from it and higher values is present at stage of final inspection / assembly. Thus only standard machining tolerance of CNC machine does not decide the fate of final job.
CNC Machining Tolerance
It is particular to machine itself because every machine has its own accuracy value present on its specification / data sheet which tells the user to decide that which one is more suitable for it. The accuracy of any machine depends upon the machining cantilever, digital manufacturing, precise machining tools and deviation in machining bed. Off course cost and application of user decide that which CNC machine accuracy is more suitable for him. Quality CNC machine manufacturing material and their surface roughness values are the main factor to decide the control of dimension deviation in the name of tolerance.
Protolabs Tolerances
Before actual engineering work there is always requirement for qualification of job as per somecodeandstandardof jobbecausemass productionis not thefirst stageinanygood engineering practice. Thus it is necessary to manufacture the prototype job first but with same machining tolerances as of original one, you cannot compromise the deviation in dimension of job because of functional and assembly test qualification need. Thus question arises that how much general machining tolerances for these prototype jobs should be, answer to it is 0.13 mm (same value is also present in CNC machines of Protolabs).
Tolerances by CNC Machining Process
This process has many types for machining process for example Grinding, Drilling, Boring, Turning, Milling and Cutting are the major categories to do it. But every process does not have the same machining tolerances because each one has its own procedure anddeviationinmachiningbed. Thustoleranceallocationmethodisalsodifferentforeach process, that is why tolerance measurement data shows that CNC machining drilling process has low tolerance values than the CNC grinding process because surface roughness and machining cantilever mechanism is not so much accurate in case of CNC drilling process.
CNC Milling Tolerance Chart
As it is shown in Table.No.1 that minimum milling tolerance is 0.014 mm, which is near to zero machining tolerance, but as the basic dimension of job goes to higher side then milling machining tolerances have deviation from the minimum tolerance value. Maximum value of machining tolerance is 0.097 mm for the basic dimension of 500 mm because this much big dimension can easily adjust the deviation of 97 microns on either left or right side of the central value. It is precise in digital manufacturing because here workpiece is stationary and tool is in motion with good tolerance measurement.
Click here for information about machining parts made from milling process.
| Basic Dimension (mm) | Tolerance (mm) |
| Upto 3 mm | 0.014 |
| 3-6 | 0.018 |
| 6-10 | 0.022 |
| 10-18 | 0.027 |
| 18-30 | 0.033 |
| 120-180 | 0.063 |
| 400-500 | 0.097 |
CNC Lathe Tolerances Chart
In this machining operation machining pattern has some limitation due to moving workpiece and stationary tool, thus there is less chance of deviation in dimension of machining. Although machining cantilever mechanism do exist in job chuck holder, but Table.No.2shows the minimum value of machining tolerance 0.010 mm onthe minimum basic dimension value of ± 3 mm. You can see the comparison in Table.No. 1 and 2 to see the difference in machining tolerance values. Milling machining tolerances are less tighter than lathe values because of machining pattern, machining cantilever advantage, no deviation in machining bed and precise machining tools.
Lather machining parts information isavailable herefrom one of the best manufacturer of it.
| Basic Dimension (mm) | Tolerance (mm) |
| Upto 3 mm | 0.010 |
| 3-6 | 0.012 |
| 6-10 | 0.015 |
| 10-18 | 0.018 |
| 18-30 | 0.021 |
| 120-180 | 0.040 |
| 400-500 | 0.063 |
Table.No.2 Lathe Tolerance Chart.
CNC Cutting Tolerance Chart
In this process shearing action makes the cutting on the section of the workpiece/job with taking some space from the both side of cantilever. Now it is necessary to remove the materialfrom bothsides of cuttingcantilever, thus machiningtolerances do not have good range due to extra material removed. For example band saw is cutting operation which can also have CNC operation with it, and standard machining tolerance is 0.100 inch or 2.54mm. That is why cutting operation is not primary part of machining technology for achieving zero machining tolerances and does operation at earlier stage.
Tight Tolerance Machining
It is nomenclature for the process where minimum deviation in dimension is target of machining tolerances process, one primary factor for achievement of this much tolerance is CNC machine capability but there maybe secondary factors too. You have to control the calibration, temperature, tool wear and machining bed deviation, so that tight machining tolerances are the result in final product. In published data the maximum accuracy of tight tolerances is 0.005 mm because it is just five microns in numeric value that is why lesser value than this is not the possible scenario by machining phenomenon.
ISO 2768 Standard
It is standard which deals with general tolerances in assembly of engineering structure, because there should be some standard tolerance guide for following the engineering practices in assembly that is why this standard is available for international reference. There are classes in this standard which decides that what type of machining tolerances is the need of project, classes are Fine, Medium, Coarse and Very Coarse with permissible machining tolerances in basic dimensions. Table.No.3 discuss about the same classes.
|
Class |
Dimension and Tolerance Range (mm) |
||||
|
|
0.5- 3 |
3-6 |
6-30 |
120-400 |
2000 to 4000 |
|
Fine |
±0.05 |
±0.05 |
±0.1 |
±0.2 |
±Nil |
|
Medium |
±0.1 |
±0.1 |
±0.2 |
±0.5 |
±2 |
|
Coarse |
±0.2 |
±0.3 |
±0.5 |
±1.2 |
±4 |
|
Very Coarse |
± Nil |
±0.5 |
±1 |
±2.5 |
±8 |
ISO 13920-bf tolerance pdf
It is standard which have tolerances for welding structures because almost every engineering structure which has machining do have welding in it, that is why tolerances for both machining and welding is the main need of it. This standard deals with welding deviation from basic dimension because weld has lot of deformation in it which can cause misalignment of structure in linear direction, that is why its tolerance is always in greater value than machining tolerances. Table.No. 4 shows welding linear dimension tolerance,
Tolerance Class Dimension and Tolerance Values (mm)
|
Tolerance Class |
Dimension and Tolerance Values (mm) |
||||
|
|
2-30 |
30-120 |
400-1000 |
1000-2000 |
Over 2000 |
|
A |
±1 |
±1 |
±2 |
±3 |
±9 |
|
B |
±1 |
±2 |
±3 |
±4 |
±16 |
|
C |
±1 |
±3 |
±6 |
±8 |
±27 |
|
D |
±1 |
±4 |
±9 |
±12 |
±40 |
3 Tips for Acquiring Precision Machining Tolerances
Precise machining tolerances are always need of any machinist because if you to do quality work then it should be precise and accurate for assembly process. 3 major points which can acquire precise machining work are,
Temperature Control
Temperature control can make the thermal expansion of metallic material to minimum because if you are machining job on workpiece at 50 °Cthen off course it will give different result comparing with 20 °Cresults.
Vibration Control
Vibration due to high floor workshop, crane movement and heavy transportation on floor can also cause deviation in machining tolerances.
Qualification
Qualification of Job, Machinist and CNC machine also results in good machining tolerances.

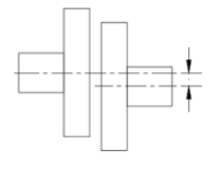
Figure.No.3 shows misalignment in assembly.
How Precision Impacts Product Quality
It is always the need of assembly designer that good quality machining tolerances are present whenever the job is present ion physical form. That is why all effort is put in job to get the good machining tolerances otherwise out of tolerance job make problem in mass production. Because if each product out of many have different dimensions to mate with its counterpart then it is probable event that neither product can assemble at application stage. For example machining tolerance of car maintenance part can make rejection of all parts in market if dimensional deviation is not in range.
How to Zero Tolerance Machining
This is the term which reflects that machining tolerance are at minimum level instead of exactly zero numeric value, because zero value achievement is not possible by any physical means. You can say 0.010 mm is close to zero tolerance machining value from authentic published literature available in machining field. Ways to achieve this much tolerances are Control in material composition, Machining Calibration, Qualification, Temperature, Tools flatness and Workpiece heat treatment. If there is control in these factors then you can do the precise work and machining on job without any repair or rework.
Why Choose China Tuofa Custom CNC Machining Parts
When you have to make custom parts as per novel design then there comes need of machining for tolerances having mating parts coherence. For this purpose you have to choose the machinist and CNC machine with qualification criteria so that money and resources are not wasted. Tuofa china has ISO 9001 certification with vast experience of CNC machining (both metallic and non-metallic materials) and have capability to achieve the machining tolerance of < 0.010 mm even with tight production schedule. Thus do contact Tuofa for achievement of machining tolerances and get quotation for your work within 24 hours.
For more information please visit tuofa-cncmachining.com
FAQs
What is Tolerance in Machine Design?
Machine design elements have sequence to assemble with each other because alone one component cannot give output and for assembly process there is one requirement which is called as machining tolerances. And these tolerance are the numeric values to tell that how much deviation from basic dimension can be for normal working of particular machine or mechanical structure assembly. Engineering Tolerance?
There can be standard machining tolerances which tell the designer to how much deviation in dimension will not make effect on structure or assembly without making strict criteria of tight or zero machining tolerances.
Standard Machining Tolerances in mm?
Value for this kind of tolerance is 0.13 mm and this kind of machining tolerance is not so much tight tolerance because minimum tolerance value can be as low as 0.010 mm , about 13 times less than the standard machining tolerance.
 Tel/WeChat:
  Email:
 Home
Home
 Swiss Machining Ultimate Guide: Precision and Efficiency


