How to Use a Micrometer: A Comprehensive Guide
 Aug 07,2023

Micrometers are used for precise measurements. At manufacturing of any product, precision of dimensions always have its own significance. Aerospace, automotive, horology, electronics and medical sciences are taking advantage of micrometer at ground work as well as basic level. For instance, consider a bolt and screw which required good fitting, which could only be achieved by close tolerances and highly precise measurements. Many bolts are used in automotive and aerospace industry, suppose one bolt is not closely fit due to less dimensional precision.
Also, if bolt and screw are not closely fit, continuous movement of screw in bolt could damage teeth of screw, as a result, screw will stop performing its function. It could cause a failure of the product and will result in human as well as product loss. It was just one example to elaborate the importance of dimensional precision in industries. This article will further reinforce, the significance of micrometer.
Understanding Micrometers
Micrometers are devices used to measure quite small measurements precisely. Sample is kept between spindle and anvil of the micrometer. It is capable of measuring the dimension below one inch depth, thickness and length. As industries are evolving, dimensional tolerance became a highlighted issue in past. As per current era’s requirement, close dimensional tolerance along with maximum profit is in demand. It is portable, easy to use, high efficiency and consistency are few advantages of micrometer among many.
For further information regarding micrometers, check this link;
Different Types of Micrometers
Measuring range is 25mm which means micrometer is capable of measuring 0 to 25mm or 25mm to 50mm [2]. Different types of micrometers are available in market to provide precise measurements as per application which will be explained one by one;
-
Vernier Micrometer
It is a caliper type and extensively used in industries at daily basics for quality control. It can measure inner and outer dimensions of the components. Vernier calipers can also provide digital readers for more consistency and eliminating the human error factor.
-
Point Micrometer
It is used to measure the dimensions of ball or spherical or round objects. It has a pointed spindle and ball like anvil. Ball bearings are commonly measured by point micrometer which is also known as ball micrometer.
-
Blade Micrometer
It has a flat-blade like anvil which can be inserted on the both surfaces of sample and accurate reading can be taken. It is used to measure the thickness of thin sheet such as metal sheet and paper.
-
Depth Micrometer
It is a micrometer which is used to measure the distance between two parallel surfaces such as depth of the hole, projections and slot. It consist of a rod which is inserted into the hole until it touches the base of the hole and depth on the micrometer will be recorded.
-
Outside Micrometer
It is used to measure the thickness and diameter of the object. It is like a clamp, a sample is kept between the anvil and spindle. Spindle is moved to clap the object. Readings shown on the scale will be recorded [3].
-
Inside Micrometer
It is used to measure the internal diameter of the pipe or cylinders. To deliver assemblies and components with accurate dimensions, machinist and mechanics use this device extensively throughout the process for high repeatability.
- Tube Micrometer
It is used to measure the thickness of tubes [5].
For tubular micrometer, check this link;
Which Type of Micrometer Includes a Stopping Plate
Depth micrometer includes a stopping plate. As it is already mentioned that, it is used to measure the depth of the recesses, slots and holes. A stopping plate attached to the measuring rod which prevent the movement of measuring rod beyond requirement.
Micrometer symbol
Symbol of micrometer is µm. It is a twelfth letter of Greek alphabet µ, which is micro, joined with m of meter. It is a millionth part of a meter as micro is 106. It means that measurements with such accuracy is taken by micrometer.
1µm = 0.001 millimeter
1µm = 0.0000001 meter
How to read a micrometer
This section will make you capable of reading micrometers, efficiently and effectively. Following set of subsections will be briefly discussed to achieve end purpose which is reading of micrometer, accurately.
Micrometers Abbreviation
Abbreviation of micrometer is µm and also known as micron. Micrometer is a unit of length or distance between two points.
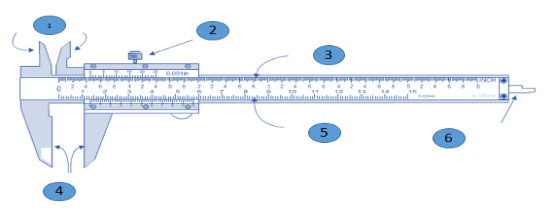
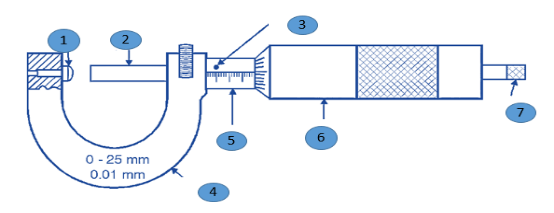
|
Marking |
Screw gauge |
Vernier caliper |
|
1 |
Anvil |
Internal Jaw |
|
2 |
Spindle |
Locking screw |
|
3 |
Zero adjustment |
Imperial scale |
|
4 |
Frame |
External jaw |
|
5 |
Barrel (main scale) |
Matric scale |
|
6 |
Circular scale (Thimble) |
Depth measuring blade |
|
7 |
Ratchet Screw |
|
Parts of a micrometer
If you are a mechanic or engineer, you should only know that a micrometer is a tool for measuring length, which mainly consists of the following parts:
Micrometer main body: including precision screw rod, micrometer screw rod, moving drum and fixed drum, etc.
Cursors: Used to indicate measured values.
Dial: Used to display measured values.
Ratchet: Used to limit the force applied during contact measurements.
Micrometer Parts Diagram
How to Hold a Micrometer
There are two ways of using a micrometer. First one is, holding it in hand and other one is fixed on a bench. Micrometers are delicate measuring instruments; moderate pressure need to be applied while using. High pressure could distort the frame. If adequate pressure is not applied, there will be a change in reading by 0.001 inches.
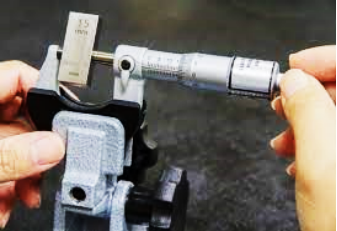
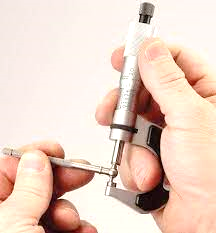
So, moderate pressure must be kept and this will be learnt by practice. There is another option of regarding usage of ratchet which will press the sample with same force each time. There will also be a case, where holding the sample with one hand and micrometer with other hand while ratchet is beyond access, so in that case feel and practice would be more appropriate approach as compared to ratchet usage.
How to Calibrate a Micrometer
Calibration of micrometers is quite important as these instruments are used for critical measurements and to ensure the precision, calibration of micrometers should be periodically carried out. Zero error is checked, if there is any error than calibration is carried out.
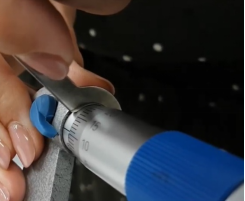
Zero error is when linear scale is not aligning with thimble zero. A square block of 25mm is placed between spindle and anvil and held it. Ratchet is rotated until three clicks. As we already know that thickness of the block is 25mm, reading won’t be same on screw gauge. Now take a C shaped spanner and rotate the cylindrical shaped linear scale, clockwise or anti clockwise depending on the error type. Fix the linear scale line with the circular scale zero.
How to use a Micrometer
Following steps will make you capable of using micrometer, effectively;
Zero Error
Record zero error, if any.
Placement of Object
Place the object between anvil and spindle in U-shaped frame. Anvil and spindle are also known as stud and screw, respectively.
Fixing/Holding the Object
Move the spindle or screw by rotating the thimble or ratchet in anti-clockwise direction, until object is fixed between anvil and spindle. Anvil is immovable.
Ratchet Screw
Instead of rotating thimble, ratchet can also be rotated to fix the object between anvil and spindle. Ratchet makes sure that uniform pressure is applied while holding the object for measurement. Rotate the ratchet until it clicks three times and then take the readings.
Hollow Cylindrical shaped Linear Scale
It is found parallel to the spindle and anvil having pitch scale. This scale is also known as index scale, pitch scale or main scale.
Circular Scale
This scale is circular in respect of main scale. Record the readings.
Formula for Recording Screw Gauge Reading
Screw gauge reading = (linear scale reading + Circular Scale Reading coinciding linear scale) * least count
Linear Scale Reading = Note the reading on the linear scale while firmly holding the object.
Circular Scale Reading = Reading at which linear scale line coincide.
How to read a micrometer in inches
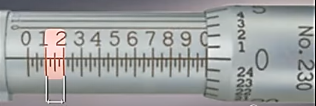
Distance between two long lines on linear scale= 0.100

Distance between two small lines = 0.25”
Thimble has total number of lines on circumference = 25
1 line = 1000th of an inch
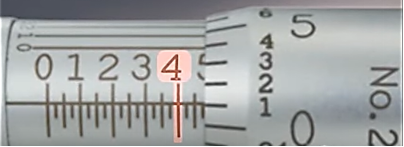
- On linear scale = 0.400
- Three intermediate lines = 3*0.25 =0.075
- Reading on the thimble =0.001
Final reading =0.476 inches
How do you read a micrometer screw gauge
Distance between long lines on the linear scale or sleeve = 1mm
Distance between small lines on the linear scale or sleeve = 0.5mm
Total length/divisions of sleeve = 25mm
Total divisions of circular scale = 50
Minimum measurement possible by linear scale = Least count = 0.5mm
To calculate the least count of screw gauge;
Rotate the thimble and complete 360⁰, distance covered by spindle= Pitch = 0.5mm
Least count of screw gauge = Pitch/ total divisions of circular scales
Least count =0.5/50
Least count =0.01mm
Formula for calculation of screw gauge reading;
Measurement = main scale reading + (circular scale reading * least count of screw gauge)
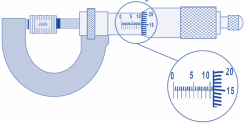
When job is held between two jaws, readings will be taken;
Main scale reading = 10 + 0.5 = 10.5
Thimble/circular scale reading =15
Measurement as per formula = 10 + (15 * 0.01)
=10.65 mm
Which number represents the vernier scale graduation of a micrometer
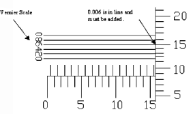
Illustration of vernier scale is given below and vernier scale has total 10 divisions. Line which perfectly coincide with thimble graduations will be added to the result.
1 vernier scale graduation having total of 5 lines = 0.002 mm
1 vernier scale graduation having total of 11 lines = 0.001 or 0.0005 mm
How to read a mm micrometer

Reading will be taken as mentioned earlier;
Main scale reading = 15.5 mm
Thimble scale reading = 0.8 mm
Viner scale reading = 0.006 mm
Measurement =15.586 mm
Micrometer and caliper
Micrometer is more precise with narrow range of measurements and caliper is used for wide variety of applications due to its wide range of measurement. In caliper, accuracy is compromised and versatility is achieved.
What are micrometers used for
Micrometers are used for measurements of very tiny objects which can fix between anvil and spindle such as;
- Holes, slots
- Thickness of wires
- Thickness of sheets
- Depth of two parallel surfaces
Limit of measurement is below 1 inch depth, length and thickness.
Factors to consider
Following factors are need to be kept in mind while using micrometers;
- Before any reading, check zero error. Linear scale line must be aligned with thimble line.
- Tightening screw should not be over tight or less tight, it can affect reading.
- Ratchet should be moderately tightened.
- Spindle should not show resistance or any friction while moving forward or backward.
- Clean up the surfaces of spindle and anvil before usage to minimize the chance of false reading.
FAQs
How to read a depth micrometer
The range of depth micrometer is 25mm or 1 inch. Number on linear scale + coincide number on thimble.
Reading will be 0.42 inches
How to read a .0001 micrometer
Vernier scale show linear lines above the main scale and each line is ten thousandth of an inch. So, one line is 0.0001.
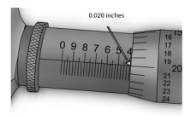
Reading will be 0.42 inches
How to read a 1-inch micrometer
1 inch micrometer can measure max. reading of 1 inch or 25mm. Take the reading on main scale corresponding to long line close to thimble scale and now add small graduations as each is 0.5mm. Now add thimble reading which is coinciding with main scale as 0.0xx. Then, add viner scale reading which is 0.001 for one division.
How to turn off Mitutoyo micrometer
Long press the ON/OFF button on the micrometer will result in turning off of micrometer. Also, it can also be turned off if kept without usage for five minutes.
 Tel/WeChat:
  Email:
 Home
Home
 How to Polish Metal | 8 Ways


